
Setting Up Email Servers - Part 2
──────────────────────────────────────────────────────────────────────────────────
Introduction
In this post, we will be continuing our email deep dive, and will be setting up hMail and Roundcube on Windows. hMail is a light-weight yet powerful email server that is easy to configure and manage. Roundcube is a web-based email client that is easy to use and has a modern interface. For our backend database, we will be using MySQL, which is a popular open-source relational database management system. For our backend web server, we will be using IIS7, which is a nice web server we can install directly from Windows Features list. If you are new to email servers, I highly recommend checking out my previous post, Setting Up Email Servers - Part 1, where we went over the basics of email servers and how they work.
──────────────────────────────────────────────────────────────────────────────────
Setting Up hMail
I set hMail up on Windows Server 2008
Jumping right into the installation, we will first need to download the packages and installers we will need for our setup.
- Roundcube 1.2.10-complete.tar.gz
- Apache Mime.Types File
- 7-Zip or other archive management program that can handle tar-balls
- hMailServer 5.2.1
- MySQL Community Server 5.6.48.0
- .NET 2.0 / 3.5 SP1 Update
- .NET 4.5.2 Install
- PHP 5.3.7 NTS version
Once we have all of our packages downloaded, we can start the installation and configuation process.
PHP
- Unzip PHP into Program Files
- Change to php.ini.production to php.ini
- Edit:
//Comment out open_basedir
extension_dir=”C:\Program Files\PHP\ext”
cgi.force_redirect = 0
cgi.fix_pathinfo=1
fastcgi.impersonate=1
fastcgi.logging=0
date.timezone = America/Chicago

//Uncomment ---
extension=php_imap.dll
extension=php_ldap.dll
extension=php_mbstring.dll
extension=php_openssl.dll
extension=php_pdo_mysql.dll
IIS
- Install Windows IIS 7. Make sure NET 3.5 and CGI Features are installed as well
- Install IIS 7 Admin Pack and continue with a typical installation
- In the Tree click on the server and add Handler Mapping & Add Module Mapping
- Request path: *.php
- Module: FastCgiModule
- Executable: "C:\Program Files\PHP\php-cgi.exe"
- Name: FastCGI
- Fast CGI Settings > Add FastCGI Application
- Environment Var
- Enter "PHP_FCGI_MAX_REQUESTS" for the Name. | 10000
- Add index.php to default document
- Edit system $PATH environment variable to include C:\Program Files\PHP
- Test PHP config. Add phpinfo.php to IIS root.
- Make sure you have bindings on the default website matching:
- http |
| 80 - http |
| 80 - Edit Permissions on Roundcube\temp && \logs to everyone write
MySQL Server
- Run MySQL Server Installation Executable
- Set root password
- Continue with hMail Installation
hMailServer
- Run hMailServer Installation Executable
- Select External DB (MySQL) instead of Built in.MySQL.
- Create New Database with type "MySQL".
- Make sure the "localhost" and that the database name is set to "roundcubemail".
- For the purposes of this guide, set the username to "roundcube" and the password to "roundcubepass"
- Open hMail Server GUI
- Create new domain (if you are using LDAP or other non-localhost authentication, make sure to set this to your domain name
- Add Users (LDAP or manual)
- Under Internet Protocol (Computer/Internet), make sure to disallow External Authentication by unchecking the boxes
MySQL Server ...
- After MySQL finishes installing, go into the command client
- Enter the following commands:
- Navigate to C:\Program Files\MySQL and spawn a cmd shell
- This should successfully create a bunch of new tables in roundcubemail.
- Go back to the MySQL command line client and verify.
SHOW DATABASES; //make sure roundcubemail is in there
CREATE USER ‘roundcube’@’localhost’ IDENTIFIED BY ‘!Password123’;
GRANT ALL PRIVILEGES ON roundcubemail.* TO ‘roundcube’@’localhost’;
FLUSH PRIVILEGES;mysql -u roundcube -p roundcubemail -e “source C:\inetpub\wwwroot\roundcube\SQL\mysql.initial.sql”;USE roundcubemail;
SHOW TABLES;Roundcube
- Untar Roundcube into IIS root
- Change the name of the folder to "roundcube"
- Open roundcube/config/config.inc.php and edit the following:
- Edit roundcube/config/defaults.inc.php and edit the following:
- Navigate to http://localhost/roundcube/installer
- Make sure all of the mandatory checks are OK
- Once clear, edit the conf file to have a localhost on SMTP Server and IMAP uses your domain if using LDAP users.
- Export the config file & replace config.inc.php
- On the Test Page, initialize the database, if there is DB Schema error like an ‘IF’ table missing. Ignore it
- If there is a mime error click on the link and save the webpage as mime.types and move it to the roundcube folder. Just make sure the path you specified in the defaults.inc.php matches.
- Navigate to http://localhost/roundcube and try to login with an account you set up in hMail
- Clean up the conf file where the installer was.
$config['db_dsnw'] = 'mysql://roundcube:roundcubepass@localhost/roundcubemail';
$config['enable_installer'] = 'true';$config[‘db_dsnw’]=’mysql://roundcube:@localhost/roundcubemail’;
$config[‘mime_types’]= ‘C:\inetpub\wwwroot\roundcube\mime.types’;
──────────────────────────────────────────────────────────────────────────────────
Hardening
Firewall Rules
| Path | Dir | Pro | Port | RemoteAddr |
|---|---|---|---|---|
| Program Files (x86)\hMailServer\Bin\hMailServer.exe | in | tcp | 25,110,143 | any |
| Program Files\Microsoft SQL Server\MSSQL{nn}.MyInstance\<> | in/out | tcp | 32608 | |
| N/A (IIS/RC) | in | tcp | 80 | any |
| N/A | in/out | udp | 53 |
Logging
Make sure to enable logging on hMailServer and Roundcube. This will help you troubleshoot any issues that may arise.
hMail - From the hMail Management Interface, go to Settings >> Logging >> and enable + log everything except for Debug and Awstats as those can get noisy.
Roundcube/IIS - Via the roundcube config file (config.inc.php), add the following lines:
$config['debug_level'] = 1; //System Error Reporting
$config['sql_debug'] = true; //Log SQL queries
$config['imap_debug'] = true; //Log IMAP4 conversation
$config[pop_debug’]=true; //Log POP3 converstation
$config['ldap_debug'] = true; //Log LDAP conversation
$config['smtp_debug'] = true; //Log SMTP conversation
Backups
hMail - From the hMail Management Interface, go to Settings >> Backup >> and create a backup of your hMail configuration.
Roundcube/IIS - From the IIS Manager, go to the root of your website and create a backup of your web.config file.
──────────────────────────────────────────────────────────────────────────────────
Setting Up SSL
SSL is a must-have for any email server. It encrypts the connection between the client and the server, ensuring that no one can eavesdrop on the conversation. There are a few ways to acquire an SSL certificate, but the most common way is to purchase one from a Certificate Authority (CA). However, if you are setting up a test environment, you can use a self-signed certificate or a free certificate from Let's Encrypt.
Acquire the Cert
We will be going through self-signing our own certificates and generating our own via LetsEncrypt. Self-signing is perfect for lab enviornments, however, certificates are not trusted by modern browsers by default.
Self-Signed in Windows 10 Powershell:
New-SelfSignedCertificate -CertStoreLocation Cert:\LocalMachine\My -DnsName "mysite.local" -FriendlyName "MySiteCert" -NotAfter (Get-Date).AddYears(10)
#OR
New-SelfSignedCertificate -CertStoreLocation Cert:\LocalMachine\My -Subject "*.example.local" -DnsName "example.local", "*.example.local" -FriendlyName "LocalStarCert" -NotAfter (Get-Date).AddYears(10)
Lets Encrypt
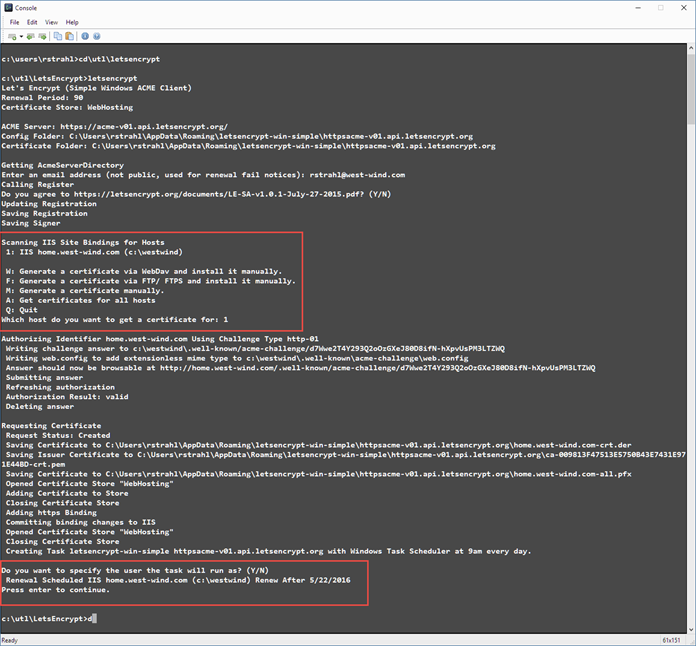
- Install Win-Acme >> Here
- Unzip & open a terminal from the folder.
- run >> LetsEncrypt
Adding the SSL certificate to hMailServer
- Start hMailServer Administrator
- Navigate to Settings->Advanced->SSL certificate
- Click Add
- Type in a SSL certificate name. This can be anything you like, but it's suggested that you set it to the host name in the SSL certificate.
- Select the certificate file and private key filed
- Save the changes
Configuring hMailServer to use the SSL certificate
- Start hMailServer Administrator
- Navigate to Settings->Advanced->TCP/IP ports
- Select a port
- Select "Use SSL" and the certificate. For more info about these options, please see Connection security.
- Save the changes
- Restart hMailServer
──────────────────────────────────────────────────────────────────────────────────
Conclusion
That's all for this post! We have successfully set up hMail and Roundcube on Windows. In the next post, we will be going over how to secure our email servers on Linux. Stay tuned!